延迟光照 · Deferred Lighting · ▶ 在线运行案例
案例合集: 三维可视化功能案例(threehub.cn)
开源仓库github地址: https://github.com/z2586300277/three-cesium-examples
**400个案例代码: ** 网盘链接
你将学到什么
- ShaderMaterial 自定义着色器实现核心视觉效果
- EffectComposer 多 Pass 后期处理管线
- UnrealBloomPass 辉光 Bloom 效果
- OrbitControls 相机轨道交互
- FBXLoader 加载 FBX 城市/角色模型
requestAnimationFrame渲染循环与resize自适应
效果说明
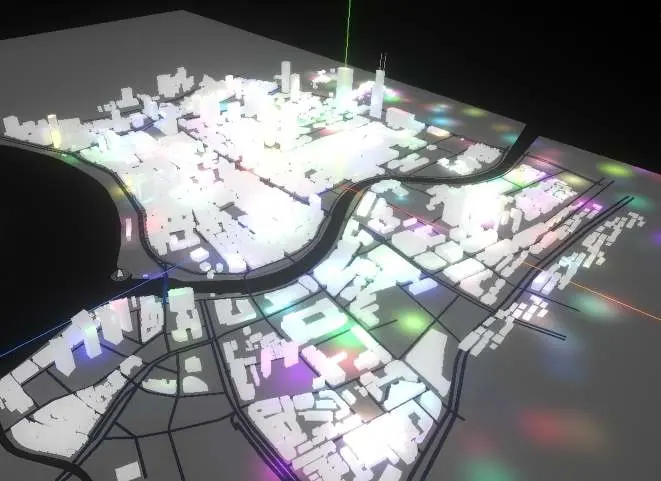
本案例演示 延迟光照 效果:原场景渲染后经 EffectComposer 叠加 Bloom/模糊等全屏后期;核心用到 ShaderMaterial、EffectComposer、UnrealBloomPass。建议先打开文首在线案例查看动态画面,再对照下方源码逐步理解。
核心概念
- Scene / Camera / WebGLRenderer 构成最小渲染闭环;大场景可开
logarithmicDepthBuffer缓解 Z-fighting。 - ShaderMaterial 通过
uniforms+ 自定义 GLSL 控制逐像素/逐点效果;透明粒子常配合depthTest: false。 - EffectComposer 以多 Pass 链式渲染:RenderPass → 特效 Pass → 输出屏幕,替代直接
renderer.render。 - OrbitControls 提供轨道旋转/缩放;开启
enableDamping后需在 animate 中controls.update()。
实现步骤
- 搭建 Scene、PerspectiveCamera、WebGLRenderer,挂载 canvas 并处理
resize - 异步加载模型 / 3D Tiles / GeoJSON 等资源并加入 scene 或 entities
- 定义 uniforms / onBeforeCompile 或 ShaderMaterial,编写 GLSL 与材质参数
- 组装 EffectComposer Pass 链,在 animate 中调用
composer.render() - 创建 OrbitControls(及 Raycaster 等交互控件,若源码包含)
- 在
requestAnimationFrame循环中更新状态并 render(Cesium 为viewer.render或自动渲染)
代码要点
import * as THREE from 'three';
import Stats from 'three/examples/jsm/libs/stats.module.js';
import { FBXLoader } from 'three/examples/jsm/loaders/FBXLoader.js'
import { OrbitControls } from 'three/examples/jsm/controls/OrbitControls.js'
import { EffectComposer } from 'three/examples/jsm/postprocessing/EffectComposer.js';
import { RenderPass } from 'three/examples/jsm/postprocessing/RenderPass.js';
import { UnrealBloomPass } from 'three/examples/jsm/postprocessing/UnrealBloomPass.js';
import { GUI } from "three/addons/libs/lil-gui.module.min.js"
const gui=new GUI()
const bloomParams = {
    exposure: 1,
    bloomStrength: 0.01,
    bloomThreshold: 0,
    bloomRadius: 0.5
};
console.log('Three.js 版本:', THREE.REVISION);
// 初始化场景、相机、渲染器
const scene = new THREE.Scene();
const camera = new THREE.PerspectiveCamera(75, window.innerWidth / window.innerHeight, 0.1, 10000);
camera.position.set(400, 400, 400);
scene.add(camera);
const renderer = new THREE.WebGLRenderer({
    antialias: true,
    alpha: true,
    logarithmicDepthBuffer: true
});
renderer.outputColorSpace = 'srgb'
renderer.setSize(window.innerWidth, window.innerHeight);
renderer.setClearColor(0x000000);
document.body.appendChild(renderer.domElement);

const ambientLight = new THREE.AmbientLight('#fff', 2);
scene.add(ambientLight);
// 添加性能监控
const stats = new Stats();
document.body.appendChild(stats.dom);
// 初始化控制器
const controls = new OrbitControls(camera, renderer.domElement);
controls.enableDamping = true;

const lightGroup = new THREE.Group();
const geometry = new THREE.PlaneGeometry( 10000, 10000);
const material = new THREE.MeshBasicMaterial( {color: 0xcccccc} );
const plane = new THREE.Mesh( geometry, material );
plane.rotation.x = -Math.PI/2;
scene.add(plane);
// 加载模型 fbx  未使用预览图模型 使用仓库已有的模型,最终效果与外部预览图不一致
new FBXLoader().load(HOST + '/files/model/city.FBX', (object3d) => {
    object3d.scale.multiplyScalar(0.1)
    object3d.position.set(0, -1, 0)
    scene.add(object3d)
})

//后处理管理对象
const postprocessing = {}
const numLights = 1000;
const width = numLights; // 每行存储 numLights 个光源信息
const height = 2; // 两行
// 创建一个 Float32Array 来存储数据
const data = new Float32Array(width * height * 4); // 4 通道 (RGBA)
let effectComposer,renderPass,bloomPass
const lightTexture = new THREE.DataTexture(data, width, height, THREE.RGBAFormat, THREE.FloatType);


function updateBloom() {
    bloomPass.strength = bloomParams.bloomStrength;
    bloomPass.radius = bloomParams.bloomRadius;
    bloomPass.threshold = bloomParams.bloomThreshold;
}


const WIDTH = window.innerWidth;
const HEIGHT = window.innerHeight;
initPostprocessing(WIDTH,HEIGHT)
addLight()
updateLights()
// 动画渲染
function animate() {
    requestAnimationFrame(animate)
    updateLights()
    scene.overrideMaterial = null
    //写入原场景渲染图
    renderer.setRenderTarget(postprocessing.texture1)
    renderer.render(scene, camera)
    //将定点数据 法相数据存入通道
    scene.overrideMaterial = postprocessing.gBufferPass
    renderer.setRenderTarget(postprocessing.gBuffer)
    renderer.render(scene, camera)
    renderer.setRenderTarget(null)
    renderer.render(postprocessing.scene, postprocessing.camera);
    effectComposer.render()
    stats.update()
    controls.update();
}

animate();


function initPostprocessing(renderTargetWidth, renderTargetHeight) {
    postprocessing.scene = new THREE.Scene();
    postprocessing.camera = new THREE.OrthographicCamera(-1, 1, 1, -1, 0, 1);
    postprocessing.scene.add(postprocessing.camera);
    postprocessing.texture1 = new THREE.WebGLRenderTarget(renderTargetWidth, renderTargetHeight, {
        format: THREE.RGBAFormat,
        type: THREE.FloatType,
        colorSpace: THREE.SRGBColorSpace,
        depthBuffer: true,
        stencilBuffer: false
    })
    postprocessing.gBuffer = new THREE.WebGLRenderTarget(renderTargetWidth, renderTargetHeight, {
        format: THREE.RGBAFormat, // 使用 RGBAFormat 确保有 alpha 通道
        type: THREE.FloatType, // 使用 FloatType 以确保存储精度
        depthBuffer: true, // 确保有深度缓冲
        count: 2
    })

    // G-BUFFER 管线
    postprocessing.gBufferPass = new THREE.ShaderMaterial({
        vertexShader: `
        out vec3 vNormal;
        out vec3 vWorldPosition;
        void main() {
            vNormal = normal;
            // 计算顶点的世界坐标,模型矩阵将顶点从模型空间转换到世界空间
            vec4 worldPosition = modelMatrix * vec4(position, 1.0);
            vWorldPosition = worldPosition.xyz;
            gl_Position = projectionMatrix * viewMatrix * worldPosition;
        }
    `,
        fragmentShader: `
        in vec3 vNormal;
        in vec3 vWorldPosition;
        layout(location = 0) out vec4 gPosition;
        layout(location = 1) out vec4 gNormal;
        void main() {
          gPosition = vec4(vWorldPosition, 1.0);
          gNormal = normalize(vec4(vNormal, 1.0));
      }
    `,
        glslVersion: '300 es',
    })

    postprocessing.lightMaterial = new  THREE.ShaderMaterial({
        defines: {
            EMISSIVE: 10,
        },
        vertexShader: `
      out vec2 vUv;
      void main() {
          vUv = uv;
          gl_Position = projectionMatrix * viewMatrix * modelMatrix * vec4(position, 1.0);
      }
  `,
        fragmentShader: `
    precision highp float;
    precision highp int;
    // 从 G-buffer 中读取的位置、法线和颜色纹理
    uniform sampler2D tPosition;
    uniform sampler2D tNormal;
    uniform sampler2D tDiffuse;
    uniform sampler2D tLightData;
    uniform vec2 resolution;
    uniform int offset;
    // 输入 UV 坐标
    in vec2 vUv;
    // 输出最终颜色
    out vec4 pc_FragColor;
    const int MAX_LIGHTS_PER_PASS = 50;
    float maxDistance=100.0;
    float smoothFactor=300.0;
    void main() {
     vec3 diffuse = texture(tDiffuse, vUv).rgb;
     vec3 normal = texture(tNormal, vUv).rbg;
     vec3 position = texture(tPosition, vUv).rgb;
     vec3 resultColor = vec3(0.0);
     int numLights = int(resolution.x);
     for (int i = 0; i < numLights; i++) {
        vec2 uvPosition = vec2(float(i) / resolution.x, 0.0);
        vec4 positionData = texture2D(tLightData, uvPosition);
        vec3 lightPosition = positionData.xyz;
        vec3 lightDir = normalize(lightPosition - position);
         // 计算法线与光照方向的点积
        float NdotL = max(dot(normal, lightDir), 0.0);
        // 如果 NdotL <= 0.0,跳过该光源
        if (NdotL <= 0.0) {
             continue;
        }
        vec2 uvColorIntensity = vec2(float(i) / resolution.x, 1.0 / resolution.y);
        vec4 colorIntensityData = texture2D(tLightData, uvColorIntensity);
        vec3 lightColor = colorIntensityData.rgb;
        float distance = length(lightPosition - position);
        // 使用平滑衰减函数,避免硬性阈值判断
        float attenuation = smoothstep(maxDistance, maxDistance - smoothFactor, distance);
        // 通过衰减因子对光照强度进行调整
        float intensity = colorIntensityData.a * attenuation;
        if (intensity > 0.0) {
            // 计算光照贡献
            vec3 lightContribution = lightColor * diffuse * NdotL * intensity;
            resultColor += lightContribution;
        }
    }
      pc_FragColor = vec4(resultColor+diffuse , 1.0);
  }
  `,
        glslVersion: '300 es',
        uniforms: {
            tPosition: {value: postprocessing.gBuffer.textures[0]},
            tNormal: {value: postprocessing.gBuffer.textures[1]},
            tDiffuse: {value: postprocessing.texture1.texture},
            tLightData: {value: lightTexture},
            resolution: {value: new THREE.Vector2(width, height)},
            offset: {value: 0}
        },
    })
    postprocessing.quad = new THREE.Mesh(
        new THREE.PlaneGeometry(2.0, 2.0),
        postprocessing.lightMaterial
    );
    postprocessing.scene.add(postprocessing.quad);

    effectComposer=new EffectComposer(renderer)
    renderPass=new RenderPass(postprocessing.scene,postprocessing.camera)

    effectComposer.addPass(renderPass)
    // 创建泛光效果
    bloomPass = new UnrealBloomPass(
        new THREE.Vector2(renderTargetWidth, renderTargetHeight),
        bloomParams.bloomStrength,
        bloomParams.bloomRadius,
        bloomParams.bloomThreshold
    );
    effectComposer.addPass(bloomPass);

    // 添加GUI控制
    const bloomFolder = gui.addFolder('Bloom Effect');
    bloomFolder.add(bloomParams, 'bloomStrength', 0, 1).name('强度').onChange(updateBloom);
    bloomFolder.add(bloomParams, 'bloomRadius', 0, 1).name('半径').onChange(updateBloom);
    bloomFolder.add(bloomParams, 'bloomThreshold', 0, 1).name('阈值').onChange(updateBloom);
    bloomFolder.open();

}

function addLight() {
    for (let i = 0; i < numLights; i++) {
        const randomColor = Math.floor(Math.random() * 16777215);
        const light = new THREE.PointLight(randomColor, 50);
        light.userData.initialPosition = {
            x: Math.random() * (1000 - -1000) + -1000,
            y: Math.random() * 200 + 10,
            z: Math.random() * (1000 - -1000) + -1000
        };
        light.userData.movement = {
            xSpeed: Math.random() * 2 - 1,
            ySpeed: Math.random() * 2 - 1,
            zSpeed: Math.random() * 2 - 1,
            xFrequency: Math.random() * 2 + 1,
            yFrequency: Math.random() * 2 + 1,
            zFrequency: Math.random() * 2 + 1
        };
        light.position.set(light.userData.initialPosition.x, light.userData.initialPosition.y, light.userData.initialPosition.z);
        lightGroup.add(light);
    }
}

function updateLights() {
    const time = Date.now() * 0.001; // 时间因子,控制速度
    lightGroup.children.forEach((light, i) => {
        if (light instanceof THREE.PointLight) {
            const {initialPosition, movement} = light.userData;
            light.position.x = initialPosition.x + Math.sin(time * movement.xFrequency) * movement.xSpeed * 50;
            light.position.y = initialPosition.y + Math.sin(time * movement.yFrequency) * movement.ySpeed * 50;
            light.position.z = initialPosition.z + Math.sin(time * movement.zFrequency) * movement.zSpeed * 50;

            // 填充第一行的位置信息
            data[i * 4 + 0] = light.position.x // x
            data[i * 4 + 1] = light.position.y // y
            data[i * 4 + 2] = light.position.z // z
            data[i * 4 + 3] = 0.0;          // 占位

            // 填充第二行的颜色和强度信息
            data[(width * 4) + i * 4 + 0] = light.color.r; // r
            data[(width * 4) + i * 4 + 1] = light.color.g; // g
            data[(width * 4) + i * 4 + 2] = light.color.b // b
            data[(width * 4) + i * 4 + 3] = light.intensity; // intensity
        }
    })
    lightTexture.needsUpdate = true;
}
// 窗口大小调整
window.addEventListener('resize', onWindowResize, false);
function onWindowResize() {
    camera.aspect = window.innerWidth / window.innerHeight;
    camera.updateProjectionMatrix();
    renderer.setSize(window.innerWidth, window.innerHeight);
    composer.setSize(window.innerWidth, window.innerHeight);
}
完整源码:GitHub
小结
- 本文提供 延迟光照 完整 Three.js 源码与在线 Demo,建议先运行案例再改 uniform/参数做二次实验
- 更多 Three.js 实战案例见 three-cesium-examples 合集 与 GitHub 开源仓库