雷达扫描 · Radar Scan · ▶ 在线运行案例
案例合集: 三维可视化功能案例(threehub.cn)
开源仓库github地址: https://github.com/z2586300277/three-cesium-examples
**400个案例代码: ** 网盘链接
你将学到什么
- onBeforeCompile 注入 GLSL 改造内置材质
- OrbitControls 相机轨道交互
- BufferGeometry 自定义顶点/索引数据
- EdgesGeometry 模型边线提取
requestAnimationFrame渲染循环与resize自适应
效果说明
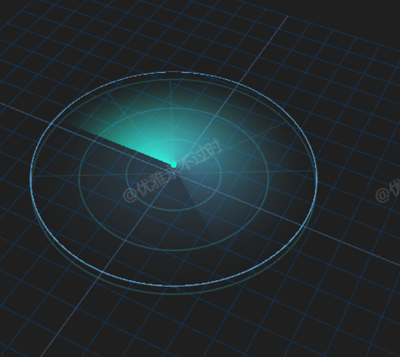
本案例演示 雷达扫描 效果:基于 WebGL 实现「雷达扫描」可视化效果,附完整可运行源码;核心用到 onBeforeCompile、OrbitControls、BufferGeometry。建议先打开文首在线案例查看动态画面,再对照下方源码逐步理解。
核心概念
- Scene / Camera / WebGLRenderer 构成最小渲染闭环;大场景可开
logarithmicDepthBuffer缓解 Z-fighting。 - onBeforeCompile 在 Three 拼好内置 shader 后替换
#include <xxx>片段,适合在 PBR 材质上叠加大屏特效。 - OrbitControls 提供轨道旋转/缩放;开启
enableDamping后需在 animate 中controls.update()。
实现步骤
- 搭建 Scene、PerspectiveCamera、WebGLRenderer,挂载 canvas 并处理
resize - 定义 uniforms / onBeforeCompile 或 ShaderMaterial,编写 GLSL 与材质参数
- 创建 OrbitControls(及 Raycaster 等交互控件,若源码包含)
- 在
requestAnimationFrame循环中更新状态并 render(Cesium 为viewer.render或自动渲染)
代码要点
import * as THREE from 'three'
import { OrbitControls } from "three/addons/controls/OrbitControls.js";

// 配置与常量
const CONFIG = {
  grid: { size: 1000, divisions: 20, color1: 0x345678, color2: 0x123456 },
  radar: {
    position: { x: 0, y: 20, z: 0 },
    radius: 240,
    color: '#2288ff',      // 更改为好看的蓝色
    scanColor: '#00ffaa',  // 更改为青绿色
    opacity: 0.5,
    speed: 300,
    followWidth: 220,
    rings: 3
  },
  markers: {
    ringColor: 0x3399aa,   // 更改为蓝绿色
    lineColor: 0x3399aa,   // 保持一致性
    opacity: 0.3,
    angleCount: 12
  }
}

// 初始化场景
const box = document.getElementById('box')
const scene = new THREE.Scene()
const camera = new THREE.PerspectiveCamera(50, box.clientWidth / box.clientHeight, 0.1, 10000)
camera.position.set(0, 800, 1000)

const renderer = new THREE.WebGLRenderer({ antialias: true, alpha: true, logarithmicDepthBuffer: true })
renderer.setSize(box.clientWidth, box.clientHeight)
box.appendChild(renderer.domElement)

const controls = new OrbitControls(camera, renderer.domElement)
controls.enableDamping = true

// 辅助网格
const gridHelper = new THREE.GridHelper(
  CONFIG.grid.size,
  CONFIG.grid.divisions,
  CONFIG.grid.color1,
  CONFIG.grid.color2
);
scene.add(gridHelper);

// 颜色转换工具函数
const hexToRgb = hex => {
  hex = hex.replace('#', '');
  return {
    r: parseInt(hex.substring(0, 2), 16) / 255,
    g: parseInt(hex.substring(2, 4), 16) / 255,
    b: parseInt(hex.substring(4, 6), 16) / 255
  };
}

// 添加圆形雷达范围标记 - 简化后的函数
function createRadarMarkers(radius, count) {
  const { ringColor, lineColor, opacity, angleCount } = CONFIG.markers;
  const markers = new THREE.Group();

  // 创建同心圆
  const ringMaterial = new THREE.LineBasicMaterial({
    color: ringColor,
    opacity,
    transparent: true
  });

  for (let i = 1; i <= count; i++) {
    const circle = new THREE.RingGeometry(
      radius * i / count,
      radius * i / count + 1,
      100
    );
    const line = new THREE.LineSegments(
      new THREE.EdgesGeometry(circle),
      ringMaterial
    );
    line.rotation.x = Math.PI / 2;
    markers.add(line);
  }

  // 添加角度标记线
  const angleMaterial = new THREE.LineBasicMaterial({
    color: lineColor,
    opacity: opacity - 0.1,
    transparent: true
  });

  for (let i = 0; i < angleCount; i++) {
    const angle = (i * (360 / angleCount)) * Math.PI / 180;
    const lineGeometry = new THREE.BufferGeometry().setFromPoints([
      new THREE.Vector3(0, 0, 0),
      new THREE.Vector3(Math.cos(angle) * radius, 0, Math.sin(angle) * radius)
    ]);
    markers.add(new THREE.Line(lineGeometry, angleMaterial));
  }

  return markers;
}

// 创建并添加雷达标记
const radarMarkers = createRadarMarkers(CONFIG.radar.radius, CONFIG.radar.rings);
scene.add(radarMarkers);

// 雷达扫描区域
const { position, radius, opacity } = CONFIG.radar;
const radarColor = hexToRgb(CONFIG.radar.color);
const scanColor = hexToRgb(CONFIG.radar.scanColor);

// 创建雷达圆盘
const circleGeometry = new THREE.CircleGeometry(radius, 1000)
circleGeometry.applyMatrix4(new THREE.Matrix4().makeRotationX(-Math.PI/2))

const material = new THREE.MeshBasicMaterial({
  color: new THREE.Color(radarColor.r, radarColor.g, radarColor.b),
  opacity,
  transparent: true
})

const radar = new THREE.Mesh(circleGeometry, material)
radar.position.set(position.x, position.y, position.z)
scene.add(radar)

// 添加雷达中心点
const centerGeometry = new THREE.SphereGeometry(5, 16, 16);
const centerMaterial = new THREE.MeshBasicMaterial({
  color: new THREE.Color(scanColor.r, scanColor.g, scanColor.b)
});
const radarCenter = new THREE.Mesh(centerGeometry, centerMaterial);
radarCenter.position.set(position.x, position.y + 5, position.z);
scene.add(radarCenter);

// 设置雷达着色器
material.onBeforeCompile = (shader) => {
  // 设置着色器uniforms
  Object.assign(shader.uniforms, {
    uSpeed: { value: CONFIG.radar.speed },
    uRadius: { value: radius },
    uTime: { value: 0 },
    uFollowWidth: { value: CONFIG.radar.followWidth },
    uRadarColor: { value: new THREE.Color(radarColor.r, radarColor.g, radarColor.b) },
    uScanColor: { value: new THREE.Color(scanColor.r, scanColor.g, scanColor.b) }
  })

  // 更新时间
  requestAnimationFrame(function update(time) {
    shader.uniforms.uTime.value = time / 1000;
    requestAnimationFrame(update);
  });

  // 顶点着色器
  const vertex = `
    varying vec3 vPosition;
    void main() {
      vPosition = position;
  `;
  shader.vertexShader = shader.vertexShader.replace('void main() {', vertex);

  // 片段着色器
  const fragment = `
    uniform float uRadius;
    uniform float uTime;
    uniform float uSpeed;
    uniform float uFollowWidth;
    uniform vec3 uRadarColor;
    uniform vec3 uScanColor;
    varying vec3 vPosition;

    // 计算角度
    float calcAngle(vec3 oFrag) {
      float fragAngle;
      const vec3 ox = vec3(1,0,0);

      float dianji = oFrag.x * ox.x + oFrag.z * ox.z;
      float oFrag_length = length(oFrag);
      float ox_length = length(ox);
      float yuxian = dianji / (oFrag_length * ox_length);

      fragAngle = degrees(acos(yuxian));
      if(oFrag.z > 0.0) {
        fragAngle = -fragAngle + 360.0;
      }

      float scanAngle = uTime * uSpeed - floor(uTime * uSpeed / 360.0) * 360.0;
      float angle = scanAngle - fragAngle;

      return (angle < 0.0) ? angle + 360.0 : angle;
    }

    // 距离衰减
    float distanceAttenuation(float distance) {
      return 1.0 - smoothstep(0.0, uRadius, distance);
    }

    void main() {
  `;

  const fragmentColor = `
    #include <opaque_fragment>

    float dist = length(vPosition);

    if(dist > uRadius - 2.0) {
      // 雷达边缘
      gl_FragColor = vec4(uRadarColor, 0.8);
    }
    else if(dist < 5.0) {
      // 雷达中心
      gl_FragColor = vec4(uScanColor, 1.0);
    }
    else {
      float angle = calcAngle(vPosition);
      float attenuation = distanceAttenuation(dist);

      if(angle < uFollowWidth) {
        // 扫描尾迹 - 颜色渐变
        float trailFactor = 1.0 - angle / uFollowWidth;
        vec3 color = mix(uRadarColor, uScanColor, trailFactor * 0.8);
        gl_FragColor = vec4(color, attenuation * (0.3 + trailFactor * 0.7));
      }
      else {
        // 雷达基础颜色
        gl_FragColor = vec4(uRadarColor, attenuation * 0.2);
      }
    }
  `;

  shader.fragmentShader = shader.fragmentShader.replace('void main() {', fragment);
  shader.fragmentShader = shader.fragmentShader.replace('#include <opaque_fragment>', fragmentColor);
}

// 动画循环
function animate() {
  requestAnimationFrame(animate)
  controls.update()
  renderer.render(scene, camera)
}
animate()

// 响应式调整
window.onresize = () => {
  renderer.setSize(box.clientWidth, box.clientHeight)
  camera.aspect = box.clientWidth / box.clientHeight
  camera.updateProjectionMatrix()
}
完整源码:GitHub
小结
- 本文提供 雷达扫描 完整 Three.js 源码与在线 Demo,建议先运行案例再改 uniform/参数做二次实验
- 更多 Three.js 实战案例见 three-cesium-examples 合集 与 GitHub 开源仓库