雷达探测 · Radar Emission · ▶ 在线运行案例
案例合集: 三维可视化功能案例(threehub.cn)
开源仓库github地址: https://github.com/z2586300277/three-cesium-examples
**400个案例代码: ** 网盘链接
你将学到什么
- Cesium Entity 高层实体 API
效果说明
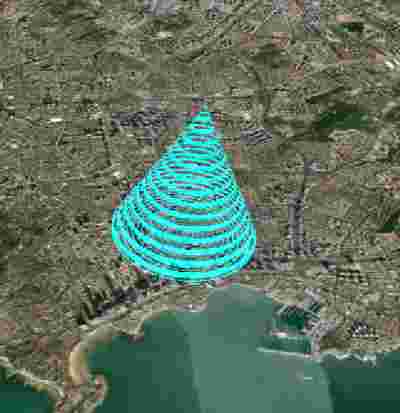
本案例演示 雷达探测 效果:基于 WebGL 实现「雷达探测」可视化效果,附完整可运行源码;核心用到 Cesium。建议先打开文首在线案例查看动态画面,再对照下方源码逐步理解。
核心概念
- Viewer 聚合 Scene、Camera、Clock 与渲染循环,是 Cesium 应用入口。
- Entity 面向点线面/模型/标签的高层 API;与 Primitive 相比更适合交互与属性驱动。
- 阅读下方完整源码时,建议从
init/load/animate三条主线入手,再深入 shader 与工具函数。
实现步骤
- 创建 Viewer,配置地形/影像(若案例需要)并设置初始相机
- 在
requestAnimationFrame循环中更新状态并 render(Cesium 为viewer.render或自动渲染)
代码要点
import * as Cesium from 'cesium'

const box = document.getElementById('box')

const viewer = new Cesium.Viewer(box, {

    animation: false,//是否创建动画小器件,左下角仪表

    baseLayerPicker: false,//是否显示图层选择器,右上角图层选择按钮

    baseLayer: Cesium.ImageryLayer.fromProviderAsync(Cesium.ArcGisMapServerImageryProvider.fromUrl('https://server.arcgisonline.com/arcgis/rest/services/World_Imagery/MapServer')),

    fullscreenButton: false,//是否显示全屏按钮,右下角全屏选择按钮

    timeline: false,//是否显示时间轴

    infoBox: false,//是否显示信息框

})

// 1. 雷达材质效果实现
class RadarPrimitiveMaterialProperty {
  constructor(options = {}) {
    this._definitionChanged = new Cesium.Event();
    this.opts = {
      color: Cesium.Color.RED,
      duration: 2000,
      time: new Date().getTime(),
      repeat: 30,
      offset: 0,
      thickness: 0.3,
      ...options,
    };

    // 将属性转换为Cesium属性对象
    this._color = new Cesium.ConstantProperty(this.opts.color);
    this._time = this.opts.time;
    this._duration = this.opts.duration;
  }

  get isConstant() {
    return false;
  }

  get definitionChanged() {
    return this._definitionChanged;
  }

  getType() {
    return Cesium.Material.radarPrimitiveType;
  }

  getValue(time, result) {
    if (!Cesium.defined(result)) {
      result = {};
    }
    result.color = Cesium.Property.getValueOrDefault(
      this._color,
      time,
      Cesium.Color.WHITE,
      result.color
    );
    result.time = ((new Date().getTime() - this._time) % this.opts.duration) / this.opts.duration / 10;
    result.repeat = this.opts.repeat;
    result.offset = this.opts.offset;
    result.thickness = this.opts.thickness;
    return result;
  }

  equals(other) {
    return (
      this === other ||
      (other instanceof RadarPrimitiveMaterialProperty &&
        Cesium.Property.equals(this._color, other._color))
    );
  }
}

// 2. 注册雷达材质 - 高级视觉效果版
function registerRadarMaterial() {
  if (!Cesium.Material.radarPrimitiveType) {
    Cesium.Material.radarPrimitiveType = "radarPrimitive";
    Cesium.Material.radarPrimitiveSource = `
      uniform vec4 color;
      uniform float time;
      uniform float repeat;
      uniform float offset;
      uniform float thickness;

      czm_material czm_getMaterial(czm_materialInput materialInput) {
        czm_material material = czm_getDefaultMaterial(materialInput);

        // 计算基本参数
        vec2 st = materialInput.st;
        float dis = distance(st, vec2(0.5));
        float sp = 1.0/repeat;

        // 创建平滑波纹效果
        float m = mod(dis + offset - time, sp);
        float edgeWidth = 0.02;
        float edge = sp * (1.0 - thickness);

        // 平滑过渡的波纹
        float a = 1.0 - smoothstep(edge - edgeWidth, edge, m);

        // 距离衰减
        float distFade = pow(1.0 - dis, 1.5);

        // 脉冲效果
        float pulse = 0.5 + 0.5 * sin(time * 60.0);

        // 颜色处理 - 从中心到边缘的渐变
        vec3 baseColor = color.rgb;
        vec3 edgeColor = baseColor * 1.8;
        vec3 finalColor = mix(baseColor, edgeColor, dis * 2.0);

        // 添加时间变化的光泽
        finalColor *= 1.0 + 0.2 * sin(time * 30.0 + dis * 10.0);

        // 最终渲染
        material.diffuse = finalColor;
        material.emission = finalColor * a * distFade * 0.6;
        material.alpha = a * color.a * (0.7 + 0.3 * pulse);

        // 发光效果
        material.shininess = 80.0;

        return material;
      }`;

    Cesium.Material._materialCache.addMaterial(Cesium.Material.radarPrimitiveType, {
      fabric: {
        type: Cesium.Material.radarPrimitiveType,
        uniforms: {
          color: new Cesium.Color(0.0, 0.8, 1.0, 0.8),
          time: 0,
          repeat: 15,
          offset: 0,
          thickness: 0.4
        },
        source: Cesium.Material.radarPrimitiveSource
      },
      translucent: function() {
        return true;
      }
    });
  }
}

// 3. 创建雷达锥体
function createRadarCone(options = {}) {
  const defaultOptions = {
    position: [120.38, 36.08, 0], // 经度、纬度、高度
    heading: 0,                   // 方向角
    length: 2000,                 // 长度
    bottomRadius: 1000,           // 底部半径
    color: Cesium.Color.RED.withAlpha(0.7),
    thickness: 0.3
  };

  const mergedOptions = { ...defaultOptions, ...options };

  const position = Cesium.Cartesian3.fromDegrees(
    mergedOptions.position[0],
    mergedOptions.position[1],
    mergedOptions.position[2]
  );

  const heading = Cesium.Math.toRadians(mergedOptions.heading);
  const pitch = Cesium.Math.toRadians(0);
  const roll = Cesium.Math.toRadians(0);
  const hpr = new Cesium.HeadingPitchRoll(heading, pitch, roll);
  const orientation = Cesium.Transforms.headingPitchRollQuaternion(
    position,
    hpr
  );

  // 注册雷达材质
  registerRadarMaterial();

  // 创建雷达锥体实体
  return viewer.entities.add({
    name: "Radar Cone",
    position: position,
    orientation: orientation,
    cylinder: {
      length: mergedOptions.length,
      topRadius: 0,
      bottomRadius: mergedOptions.bottomRadius,
      material: new RadarPrimitiveMaterialProperty({
        color: mergedOptions.color,
        thickness: mergedOptions.thickness,
      }),
    },
  });
}

// 创建一个雷达锥体示例
const entity = createRadarCone({
  position: [120.38, 36.08, 0],
  heading: 45, // 朝向东北方向
  color: Cesium.Color.CYAN.withAlpha(0.7)
});

// 设置相机位置
viewer.flyTo(entity)
完整源码:GitHub
小结
- 本文提供 雷达探测 完整 Cesium.js 源码与在线 Demo,建议先运行案例再改 uniform/参数做二次实验
- 更多 Cesium.js 实战案例见 three-cesium-examples 合集 与 GitHub 开源仓库