智慧城市光 · City Light · ▶ 在线运行案例
案例合集: 三维可视化功能案例(threehub.cn)
开源仓库github地址: https://github.com/z2586300277/three-cesium-examples
**400个案例代码: ** 网盘链接
你将学到什么
- Cesium3DTileset 加载 3D Tiles 倾斜摄影
- 3D Tiles 流式 LOD 场景
效果说明
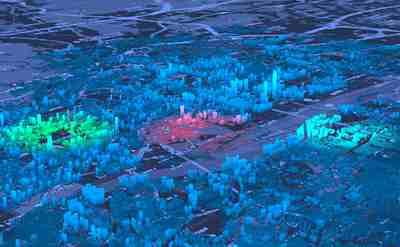
本案例演示 智慧城市光 效果:加载倾斜摄影或人工 3D Tiles 白膜并自动定位相机;核心用到 Cesium3DTileset、3D。建议先打开文首在线案例查看动态画面,再对照下方源码逐步理解。
核心概念
- Viewer 聚合 Scene、Camera、Clock 与渲染循环,是 Cesium 应用入口。
- Cesium3DTileset 流式加载 LOD 瓦片,适合城市倾斜摄影;常用
viewer.zoomTo(tileset)或viewBoundingSphere定位。 - 阅读下方完整源码时,建议从
init/load/animate三条主线入手,再深入 shader 与工具函数。
实现步骤
- 创建 Viewer,配置地形/影像(若案例需要)并设置初始相机
- 异步加载模型 / 3D Tiles / GeoJSON 等资源并加入 scene 或 entities
- 在
requestAnimationFrame循环中更新状态并 render(Cesium 为viewer.render或自动渲染)
代码要点
import * as Cesium from 'cesium'

const box = document.getElementById('box')

const viewer = new Cesium.Viewer(box, {

  animation: false,//是否创建动画小器件,左下角仪表

  baseLayerPicker: false,//是否显示图层选择器,右上角图层选择按钮

  fullscreenButton: false,//是否显示全屏按钮,右下角全屏选择按钮

  geocoder: false,//是否显示geocoder小器件,右上角查询按钮

  homeButton: false,//是否显示Home按钮,右上角home按钮

  sceneMode: Cesium.SceneMode.SCENE3D,//初始场景模式

  sceneModePicker: false,//是否显示3D/2D选择器,右上角按钮

  navigationHelpButton: false,//是否显示右上角的帮助按钮

  selectionIndicator: false,//是否显示选取指示器组件

  timeline: false,//是否显示时间轴

  infoBox: false,//是否显示信息框

  scene3DOnly: true,//如果设置为true,则所有几何图形以3D模式绘制以节约GPU资源

  orderIndependentTranslucency: false, //是否启用无序透明

  contextOptions: { webgl: { alpha: true } },

  skyBox: new Cesium.SkyBox({ show: false }),

  baseLayer: false, // 不显示默认图层

})

viewer.imageryLayers.addImageryProvider(

  new Cesium.UrlTemplateImageryProvider({

    url: 'https://webrd02.is.autonavi.com/appmaptile?lang=zh_cn&size=1&scale=2&style=8&x={x}&y={y}&z={z}',

    maximumLevel: 18

  })

)

setViewerTheme(viewer) // 设置主题

function setViewerTheme(viewer, options = {}) {

  const baseLayer = viewer.imageryLayers.get(0)

  if (!baseLayer) return

  baseLayer.brightness = options.brightness ?? 0.6

  baseLayer.contrast = options.contrast ?? 1.8

  baseLayer.gamma = options.gamma ?? 0.3

  baseLayer.hue = options.hue ?? 1

  baseLayer.saturation = options.saturation || 0

  const baseFragShader = (viewer.scene.globe)._surfaceShaderSet.baseFragmentShaderSource.sources

  for (let i = 0; i < baseFragShader.length; i++) {

    const strS = 'color = czm_saturation(color, textureSaturation);\n#endif\n'

    let strT = 'color = czm_saturation(color, textureSaturation);\n#endif\n'

    if (!options.invertColor) {

      strT += `
                color.r = 1.0 - color.r;
                color.g = 1.0 - color.g;
                color.b = 1.0 - color.b;
            `

    }

    strT += `
            color.r = color.r * ${options.filterRGB_R ?? 100}.0/255.0;
            color.g = color.g * ${options.filterRGB_G ?? 138}.0/255.0;
            color.b = color.b * ${options.filterRGB_B ?? 230}.0/255.0;
        `

    baseFragShader[i] = baseFragShader[i].replace(strS, strT)

  }

  viewer.scene.requestRender();

}

const palaceTileset = await Cesium.Cesium3DTileset.fromUrl('https://g2657.github.io/gz-city/tileset.json')

viewer.scene.primitives.add(palaceTileset)

palaceTileset.maximumScreenSpaceError = 4

viewer.camera.viewBoundingSphere(palaceTileset.boundingSphere, new Cesium.HeadingPitchRange(0, -0.5, 0))

const lightRadius = 1000.0;
const center = Cesium.Cartographic.fromCartesian(palaceTileset.boundingSphere.center)
const longitude = Cesium.Math.toDegrees(center.longitude)
const latitude = Cesium.Math.toDegrees(center.latitude)

const lightPositionRed = Cesium.Cartesian3.fromDegrees(
  longitude,
  latitude,
  100
);
const lightPositionGreen = Cesium.Cartesian3.fromDegrees(
  longitude - 0.015,
  latitude + 0.015,
  100
);
const lightPositionBlue = Cesium.Cartesian3.fromDegrees(
  longitude + 0.015,
  latitude - 0.015,
  100
);

const lightColorRed = new Cesium.Cartesian3(3.0, 0.0, 0.0);
const lightColorGreen = new Cesium.Cartesian3(0.0, 3.0, 0.0);
const lightColorBlue = new Cesium.Cartesian3(0.0, 3.0, 3.0);

palaceTileset.customShader = new Cesium.CustomShader({
  mode: Cesium.CustomShaderMode.REPLACE_MATERIAL,
  lightingModel: Cesium.LightingModel.UNLIT,
  uniforms: {
    u_lightPositionRed: {
      type: Cesium.UniformType.VEC3,
      value: lightPositionRed,
    },
    u_lightPositionGreen: {
      type: Cesium.UniformType.VEC3,
      value: lightPositionGreen,
    },
    u_lightPositionBlue: {
      type: Cesium.UniformType.VEC3,
      value: lightPositionBlue,
    },

    u_lightColorRed: {
      type: Cesium.UniformType.VEC3,
      value: lightColorRed,
    },
    u_lightColorGreen: {
      type: Cesium.UniformType.VEC3,
      value: lightColorGreen,
    },
    u_lightColorBlue: {
      type: Cesium.UniformType.VEC3,
      value: lightColorBlue,
    },

    u_lightRadius: {
      type: Cesium.UniformType.FLOAT,
      value: lightRadius,
    },
  },
  fragmentShaderText: `
        void fragmentMain(FragmentInput fsInput, inout czm_modelMaterial material) {
          vec3 positionWC = (czm_model * vec4(fsInput.attributes.positionMC, 1.0)).xyz;
          vec3 normalEC = normalize(fsInput.attributes.normalEC);
          vec3 totalLight = vec3(0.0);
          // 计算红色光源
          vec3 lightDirRed = u_lightPositionRed - positionWC;
          float distanceRed = length(lightDirRed);
          vec3 lightDirectionRed = normalize(lightDirRed);
          float diffuseFactorRed = max(dot(normalEC, lightDirectionRed), 0.9);
          vec3 diffuseRed = diffuseFactorRed * u_lightColorRed;
          float distanceFactorRed = clamp(distanceRed / u_lightRadius, 0.2, 1.0);
          // 修改为你提供的颜色
          vec3 customRedColor = vec3(0.0, 0.1, 0.3); // 自定义颜色:#3C96FA (RGB)
          // 如果在光源范围外,设置渐变颜色
          vec3 mixedColorRed = mix(customRedColor, diffuseRed, 1.0 - distanceFactorRed); // 从蓝色到红色的渐变
          totalLight += mixedColorRed;
          // 计算绿色光源
          vec3 lightDirGreen = u_lightPositionGreen - positionWC;
          float distanceGreen = length(lightDirGreen);
          vec3 lightDirectionGreen = normalize(lightDirGreen);
          float diffuseFactorGreen = max(dot(normalEC, lightDirectionGreen), 0.9);
          vec3 diffuseGreen = diffuseFactorGreen * u_lightColorGreen;
          float distanceFactorGreen = clamp(distanceGreen / u_lightRadius, 0.2, 1.0);
          // 修改为你提供的颜色
          vec3 customGreenColor = vec3(0,0.1,0.3); // 自定义颜色:#3C96FA (RGB)
          // 如果在光源范围外,设置渐变颜色
          vec3 mixedColorGreen = mix(customGreenColor, diffuseGreen, 1.0 - distanceFactorGreen); // 从蓝色到红色的渐变
          totalLight += mixedColorGreen;
          // 计算蓝色光源
          vec3 lightDirBlue = u_lightPositionBlue - positionWC;
          float distanceBlue = length(lightDirBlue);
          vec3 lightDirectionBlue = normalize(lightDirBlue);
          float diffuseFactorBlue = max(dot(normalEC, lightDirectionBlue), 0.9);
          vec3 diffuseBlue = diffuseFactorBlue * u_lightColorBlue;
          float distanceFactorBlue = clamp(distanceBlue / u_lightRadius, 0.2, 1.0);
          // 修改为你提供的颜色
          vec3 customBlueColor = vec3(0,0.1,0.3); // 自定义颜色:#3C96FA (RGB)
          // 如果在光源范围外,设置渐变颜色
          vec3 mixedColorBlue = mix(customBlueColor, diffuseBlue, 1.0 - distanceFactorBlue); // 从蓝色到红色的渐变
          totalLight += mixedColorBlue;
          material.diffuse = totalLight;
          // 计算光环效果(保持原样)
          float _baseHeight = -10.0;
          float _heightRange = 100.0;
          float _glowRange = 300.0;
          float vtxf_height = fsInput.attributes.positionMC.z - _baseHeight;
          float vtxf_a11 = fract(czm_frameNumber / 100.0) * 3.14159265 * 2.0;
          float vtxf_a12 = vtxf_height / _heightRange + sin(vtxf_a11) * 0.1;
          material.diffuse *= vec3(vtxf_a12, vtxf_a12, vtxf_a12);

          float vtxf_a13 = fract(czm_frameNumber / 360.0);
          float vtxf_h = clamp(vtxf_height / _glowRange, 0.0, 1.0);
          vtxf_a13 = abs(vtxf_a13 - 0.5) * 2.0;
          float vtxf_diff = step(0.005, abs(vtxf_h - vtxf_a13));
          material.diffuse += material.diffuse * (1.0 - vtxf_diff);
        }`,
});

GLOBAL_CONFIG.ElMessage('请自行修改为自己的城市白膜url,代码103行,此案例调用为作者本地的广州城市白膜')
完整源码:GitHub
小结
- 本文提供 智慧城市光 完整 Cesium.js 源码与在线 Demo,建议先运行案例再改 uniform/参数做二次实验
- 更多 Cesium.js 实战案例见 three-cesium-examples 合集 与 GitHub 开源仓库